So you want to make a vocalsynth! Regardless of if you plan to create a concatenative voicebank such as an UTAU (which directly manipulates audio samples) or an AI model such as Diffsinger (which generates sound after being trained on actual singing), you’ll be doing some vocal recording.
This page aims to guide you though this process in full for any type of vocalsynth you choose to create, starting from scratch.
Choosing a Microphone
The first step in creating your own virtual singer is to find a microphone to record with. There’s a lot to be aware of when selecting a good mic, so we’ll start from the beginning so you can make an educated purchase!
This is a fairly detailed guide, as it is intended to give you a solid working knowledge of which kinds of mics do what if you read it through. If you want to skip all the nonsense and go straight to our budget recommendations, feel free to do so!
Table of Contents: Types of Mics, Recording Patterns, Frequency Response, Mic Recommendations for Different Budgets
Types of Mics
First and foremost, when looking into what microphones to buy, you’ll have to choose between dynamic or condenser. These terms simply refer to the way in which the microphone processes sound waves into electrical signals, though each has its strengths and weaknesses and particular quirks.
Dynamic
These mics are known for their durability to loud sounds and therefore are the microphone of choice for live (as in concert) vocal performance. They are less sensitive and don’t capture as wide a range of sound as their condenser counterparts, but they’ll handle screaming vocals like a champ.
Dynamic mics also do not require power: they can plug directly into an audio jack and are good to go!
Condenser
Unlike dynamic mics, condenser mics require phantom power to function properly, and therefore will come in one of 2 flavors: USB (plug directly into the computer) and XLR (plug into an audio interface, which in turn plugs into the computer via USB).
Something of note when it comes to condenser microphones is the proximity effect: the closer you get to the mic capsule, the bassier and more intimate/close-sounding your recordings become. This is why condenser mics are the mic of choice for anything from podcasts to ASMR. If you’re recording particularly soft, breathy vocals, a condenser mic is your best friend! They’ll also handle loud vocals as well, just be sure to carefully adjust the gain so that you don’t overload the capsule and your recordings don’t clip (see: Volume & Tone).
Recording Patterns
Microphones record sound with differing sensitivity from different positions around the mic capsule. These can be graphed out as polar patterns. When recording vocals, generally you’ll want to use a cardioid polar pattern.
This pattern picks up sound primarily right in front of the microphone, and has less sensitivity when moving to the rear of the mic capsule.
It is so-named for the heart shape formed when graphing out the polar pattern.
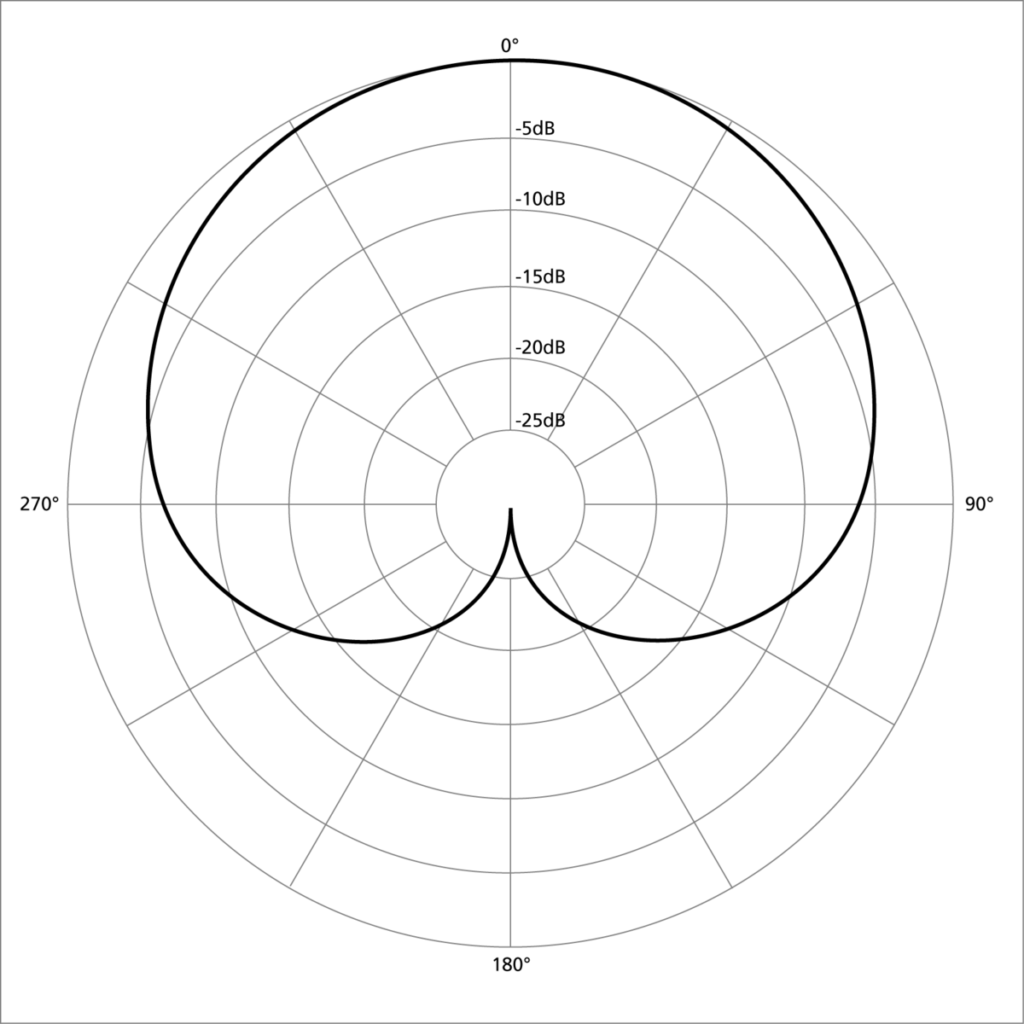
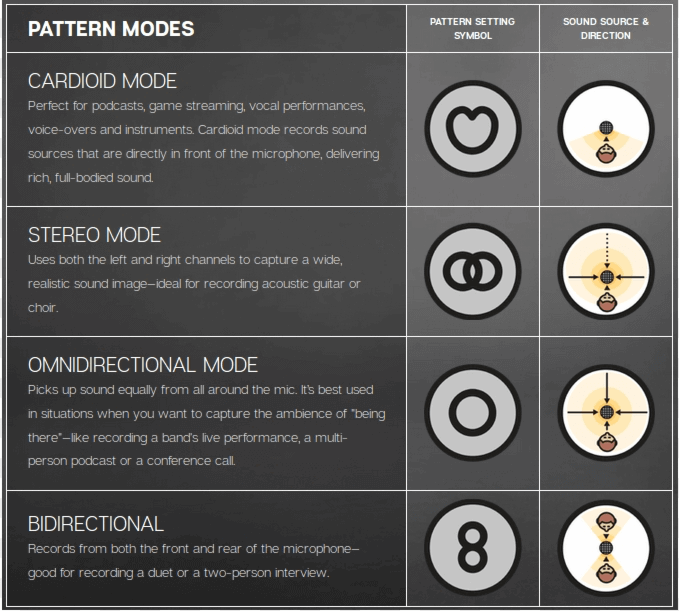
Some mid-range budget mics, such as the Blue Yeti or the Samson Satellite, are able to switch between multiple recording patterns for greater flexibility in use. While stereo can sometimes be used for vocals as well, in our case vocal recordings should be in mono (a single track, not split between left and right speakers).
Make sure that you switch the mic to its cardioid pattern before recording, and double check that the front of the mic capsule is facing your mouth as you record!
Frequency Response
Now we get into the nitty gritty of selecting a mic. Individual microphones each capture a specific range of sound frequencies, and they may be sensitive to certain frequencies over others. A microphone’s frequency response is usually represented as a graph that shows what ranges of sound the mic pics up best. What you want is a nice, relatively flat across the board frequency response that doesn’t favor bassy lows or tinny highs too much.
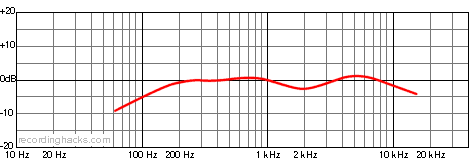
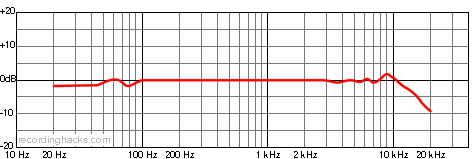
As one might expect, lower-budget mics will not be as sensitive and have a less flat frequency response, wheras typically the higher you go in price, the more finely-tuned the mic will sound.
As an example, here are the frequency maps for the Blue Yeti and the AT2020, a couple of popular UTAU mic selections. Note that the AT2020 is generally flat across the board before rolling off in the high 20kHz area, whereas the Yeti has a noticable dip at 2kHz. The flatter graph means that the AT2020 captures a more balance and accurate sound, but the wider range (down to 20Hz!) means it may also capture electrical hum from nearby electronics or low noises in your room that you might not otherwise notice, so your recording environment will be very important.
If you want your recordings to sound truer to your own voice and not muffled, thin or distorted—and/or perhaps you’re stuck at 2 mics with a similar price point—be sure to check the frequency response!
Mic Recommendations for Different Budgets
Still unsure where to begin? Here’s a shortlist of example mics that many people in the UTAU community have used over the years and can attest to!
Under $50
These are the cheapest of the cheap options for budget recording! Any cheaper and you’ll be heavily sacrificing quality. Not to say you can’t start with your webcam mic or phone (as RecStar does operate on both iPhone and Android) but if you want to start building a proper home recording setup on a budget, this list is for you!
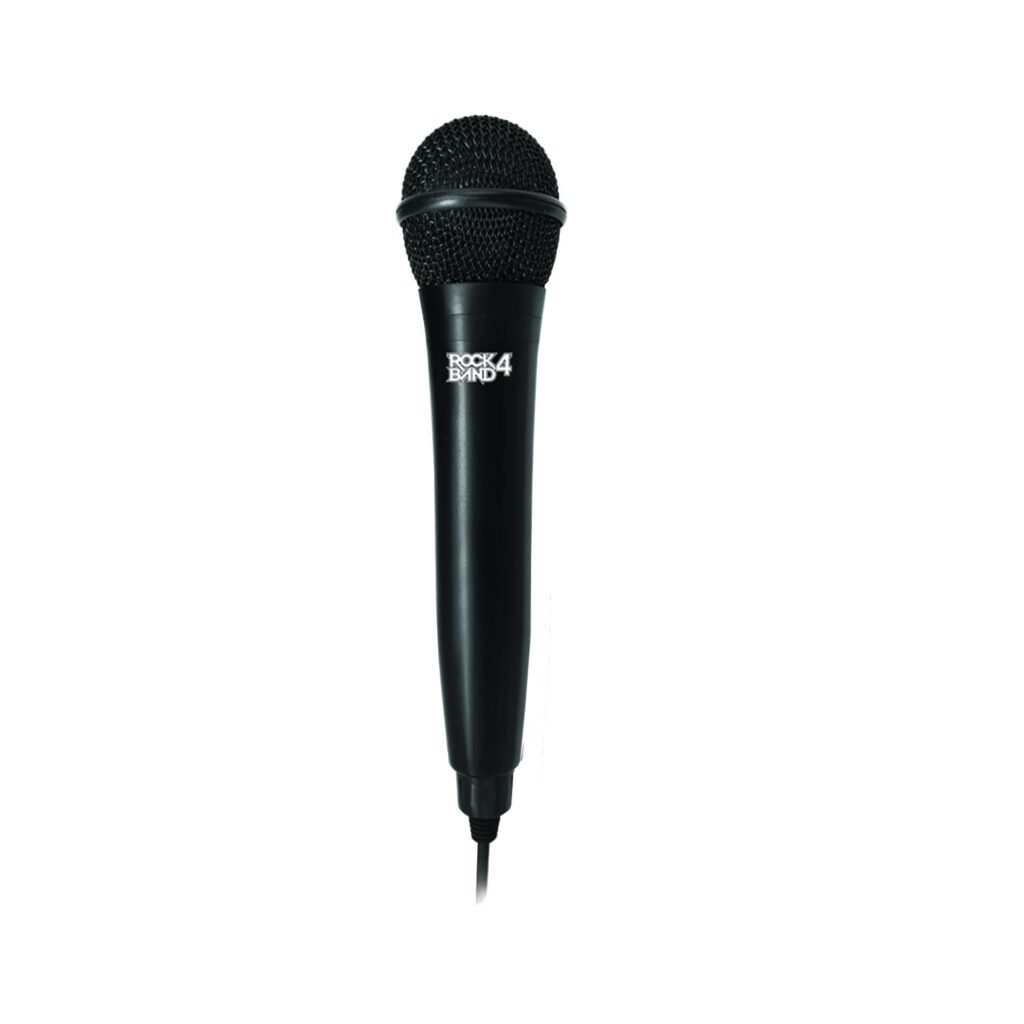
RockBand USB Mic
The only dynamic mic on our list, this little guy is a trooper from the early UTAU days. You can sometimes find these for around $10-$20 at a thrift store, so you really can’t go wrong. Just be sure to find a stand for it!
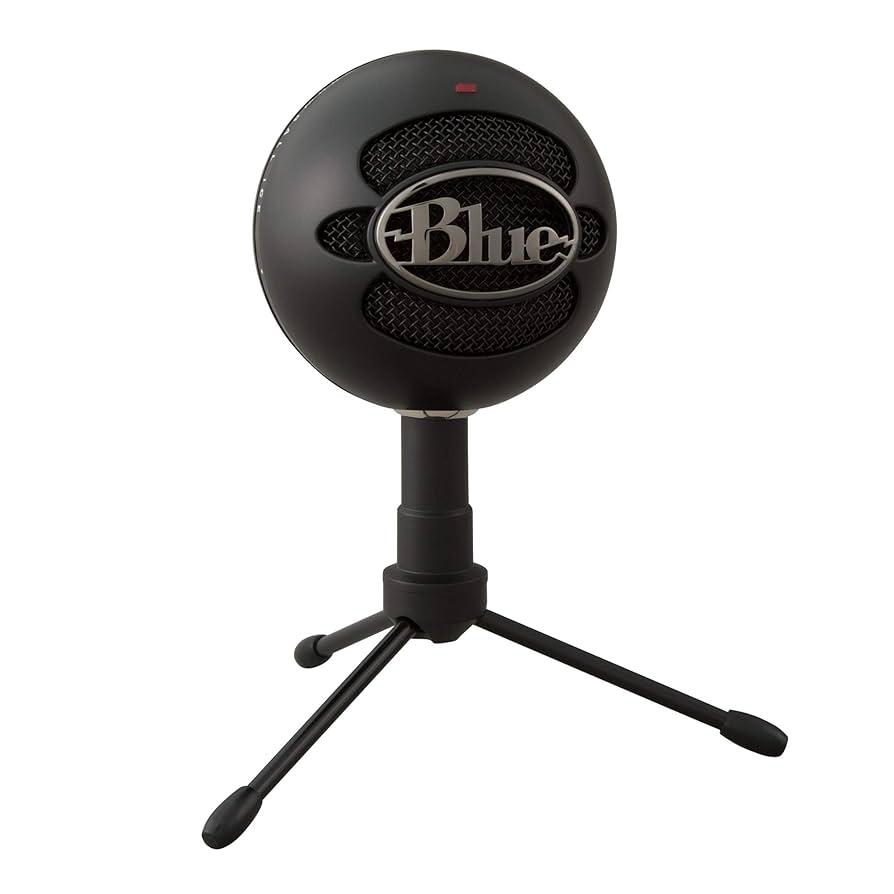
Blue Snowball
The cheapest Blue brand microphone aside from the Snowflake, which really isn’t recommended for vocalsynth recording. Another UTAU community staple, and a steal at often just $25 used.
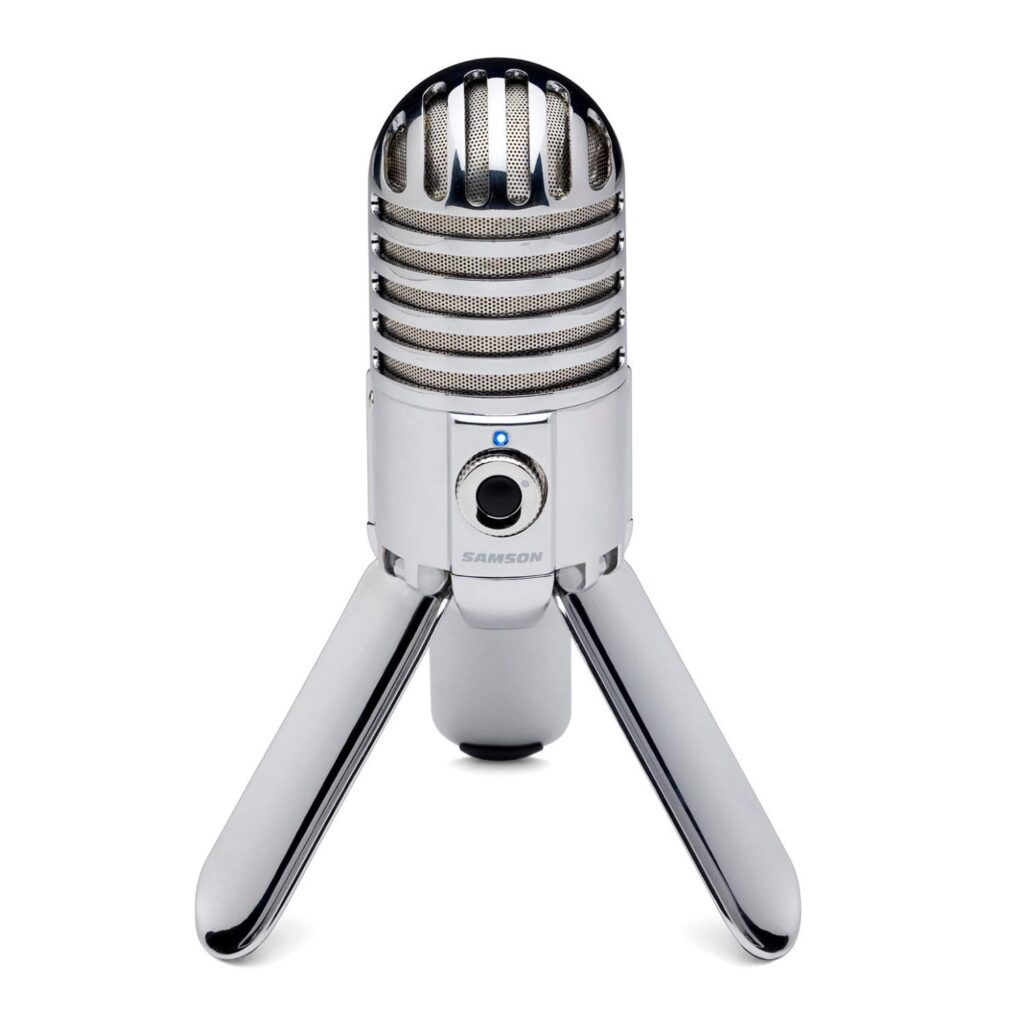
Samson Meteor
The cheapest Blue brand microphone aside from the Snowflake, which really isn’t recommended for vocalsynth recording. Another UTAU community staple, and a steal at often just $25 used.
$50 – $100
There’s quite a lot of options at this price point!
Blue Yeti Nano
This little guy is a trooper from the early UTAU days. You can sometimes find these for around $10-$20 at a thrift store, so you really can’t go wrong. Just be sure to find a stand for it!
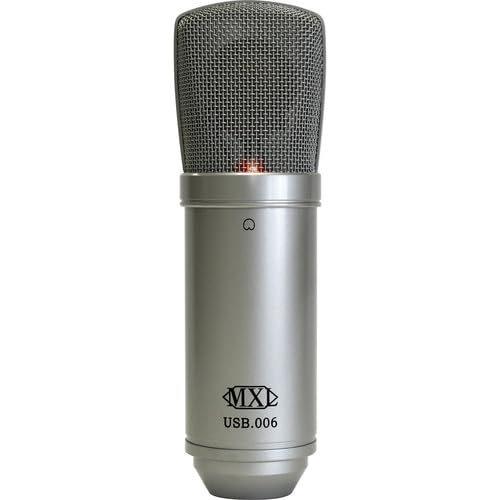
MXL USB 006
A basic cardioid USB mic from MXL. Unlike the Yeti Nano it does not have headphone monitoring, and it has a warmer/brighter sound overall.
$100-$200
At this range, we’re starting to get into the higher end USB microphones. Beyond $200 I would recommend exploring XLR options rather than USB.
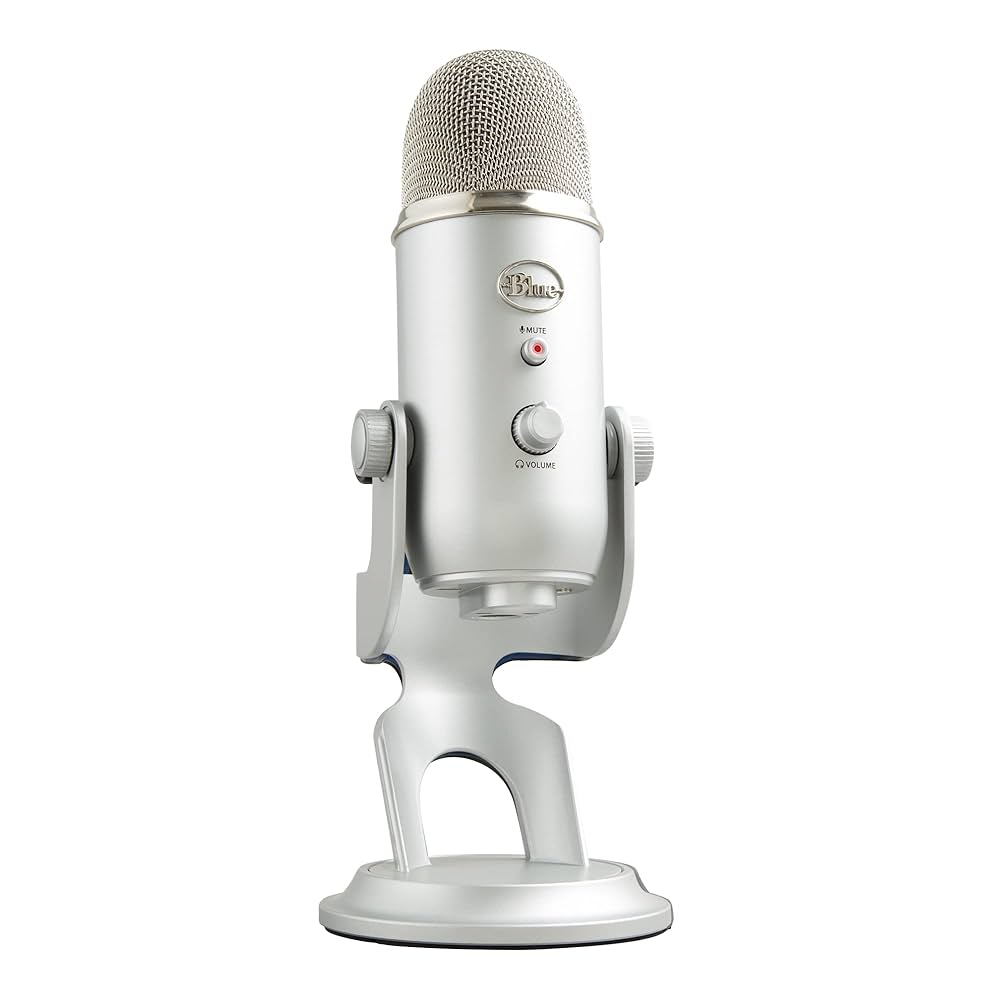
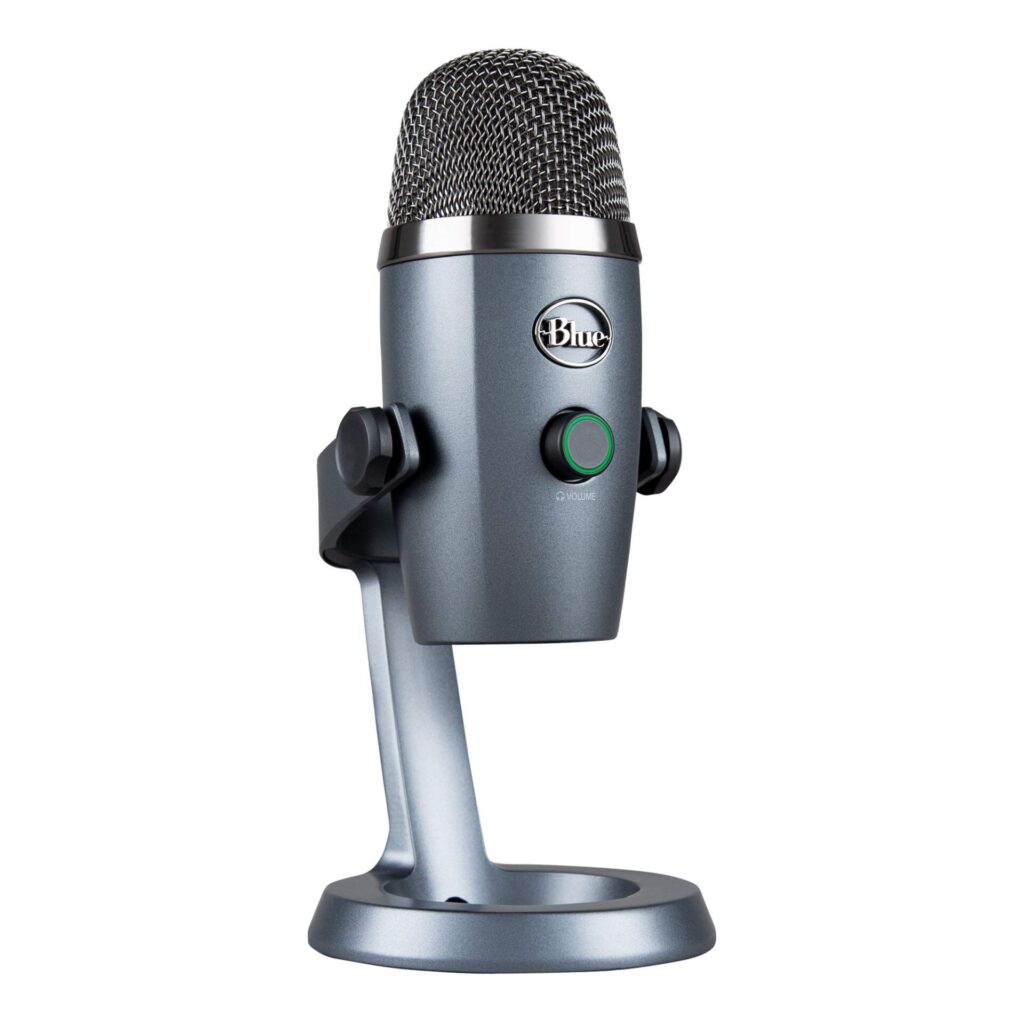
Blue Yeti
A powerhouse of a mic within the streaming and podcasting communities, the full-size Yeti’s main selling point is its 4 different recording pattern modes. The extra modes might be superfluous for vocalsynth usage, but if you believe you’ll find uses for them, it’s the most flexible option!
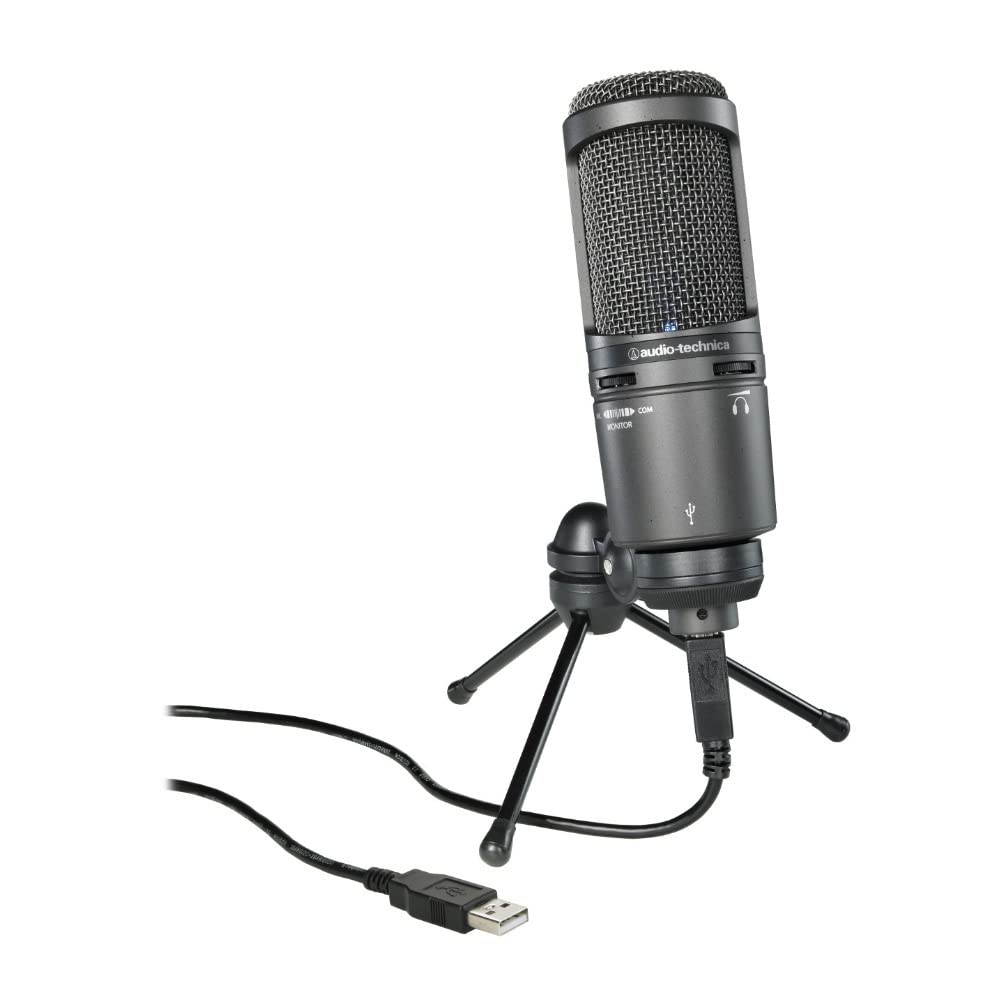
AT2020 USB-X
One of the most widely recommended entry level/budget microphones in the voice actor/voiceover business, and also in the UTAU community. The AT2020’s presence looms large, and for good reason! It’s an excellent choice at under $200.
$200 +
Once you reach this territory, you’ll probably want to start looking into obtaining an XLR microphone and additional audio interface. The XLR mics in this section may fall under $200, but they will require an interface to connect to a computer.

AT2020 XLR
As reliable as its USB counterpart, the XLR version of the AT2020 allows users to fine-tune control by using an audio interface as the intermediary between mic and computer.
AKG P200
Myst’s current setup alongside the Behringer U-Phoria. This is a solid XLR mic that conveniently comes with a shock absorbent mount and foam padded carrying case.
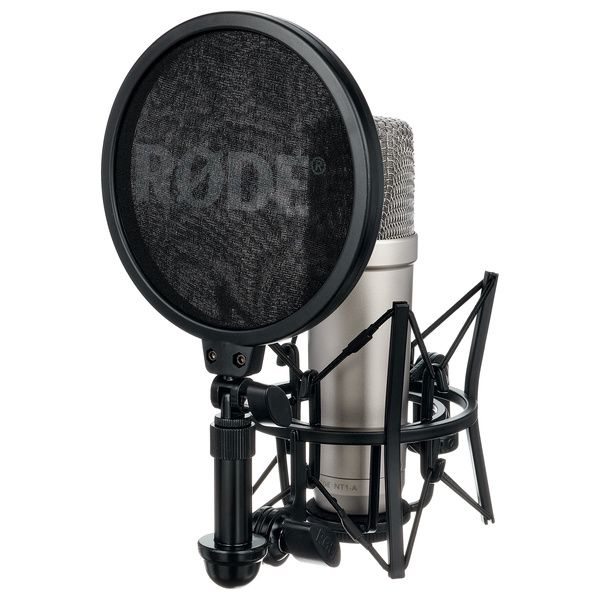
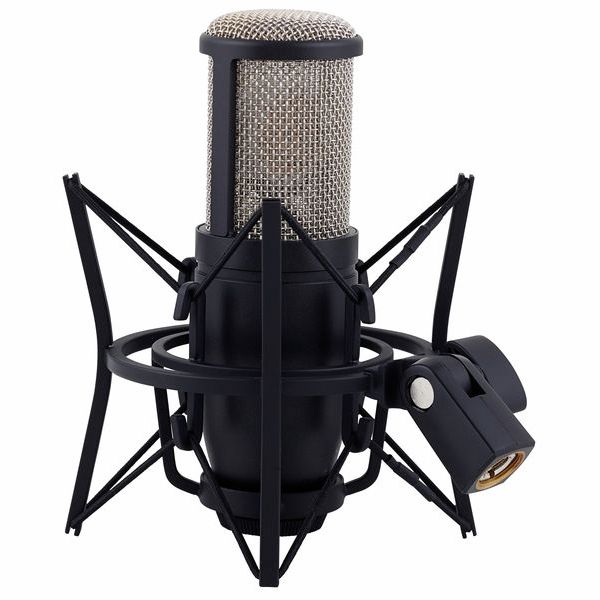
RODE NT1
.
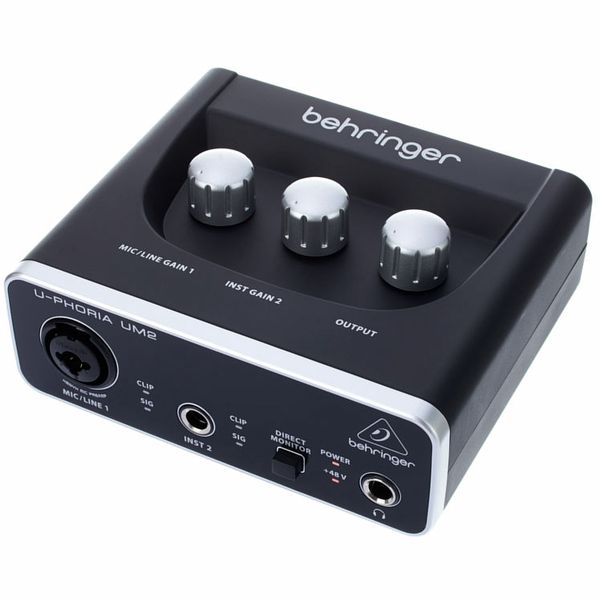
Behringer U-Phoria
A cheap little workhorse of an audio interface. Very basic, will get your fancy XLR mic plugged in and running at just $29 when on sale (check for Black Friday deals!)
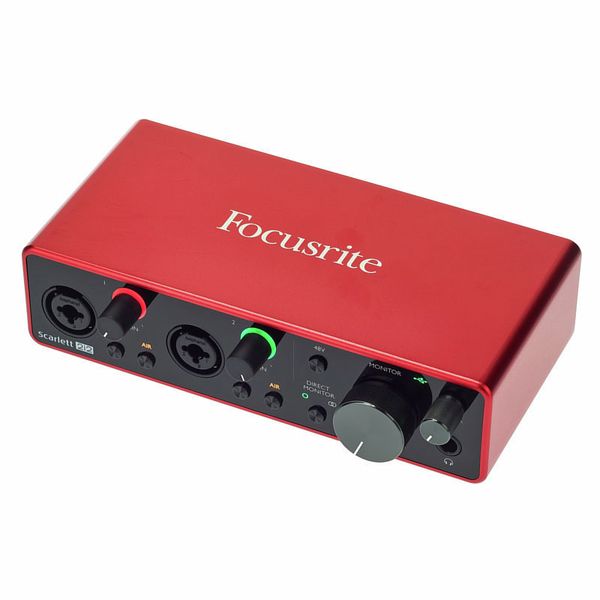
Focusrite Scarlett
A solid entry level audio interface and the choice of many beginners. Often comes in bundle deals with an included XLR microphone and headphones.
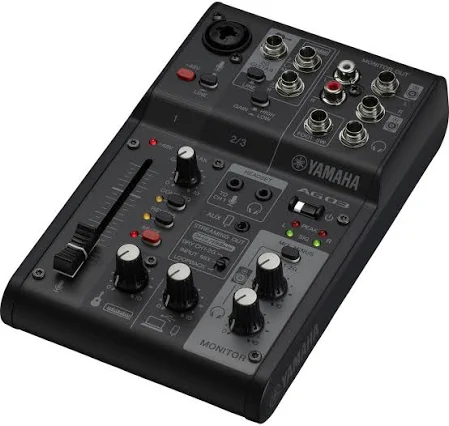
Yamaha AG03MK2
A more advanced 3-channel audio interface and mixer. Suited for users who may be using multiple mics and other audio input devices. (Also comes in a Miku flavor, if you get lucky on the secondhand market).
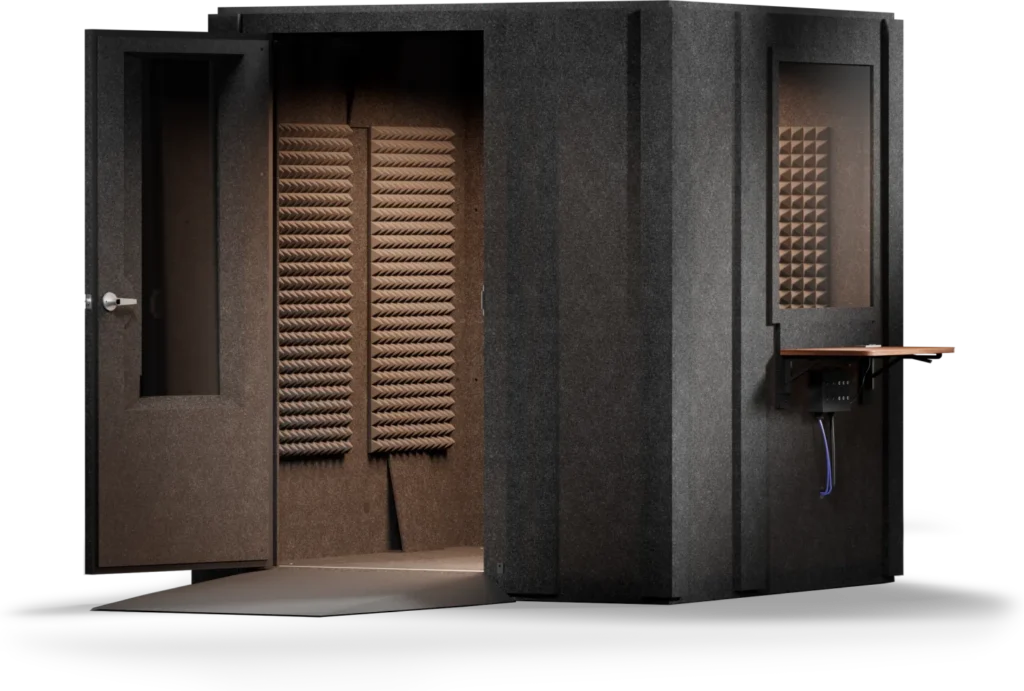
Recording Environment
The environment you record your samples in is just as crucial, if not more, than the microphone you choose! You may have the world’s most expensive mic, but if it’s particularly sensitive and you record in a big bedroom with the AC on full blast and your roommate loudly watching TV in the other room, your samples will have loads of noise or echo that may need to be removed in post. We want to do our best to avoid having to do that, as most free methods of de-noising samples aren’t perfect and may reduce the overall quality of the samples if used too much.
Typically, you want to pick a small, enclosed, padded space to record in away from other appliances/electronics and pipes. Closets are often the ideal budget recording booth, if you can find a way to fit your setup into the space. However, there are other ways to ensure cleaner recordings than finagling a computer into your wardrobe.
Helpful Mic Accessories
The following items can assist with getting cleaner, more crisp recordings from any recording setup, and are highly recommended regardless of your microphone or space!
Pop Filters
The first recording accessory I ALWAYS recommend is a pop filter. A pop filter is a shield that goes in front of the microphone and prevents puffs of breath caused by certain vocalizations from adding unpleasant pops of noise in the recordings (such as “p”s and “f”s in particular).
You can buy a basic round pop filter with gooseneck attachment for cheap on Amazon and at most music stores (Guitar Center, etc.), but you can also easily DIY one with an embroidery hoop, some pantyhose, and a wire coathanger!
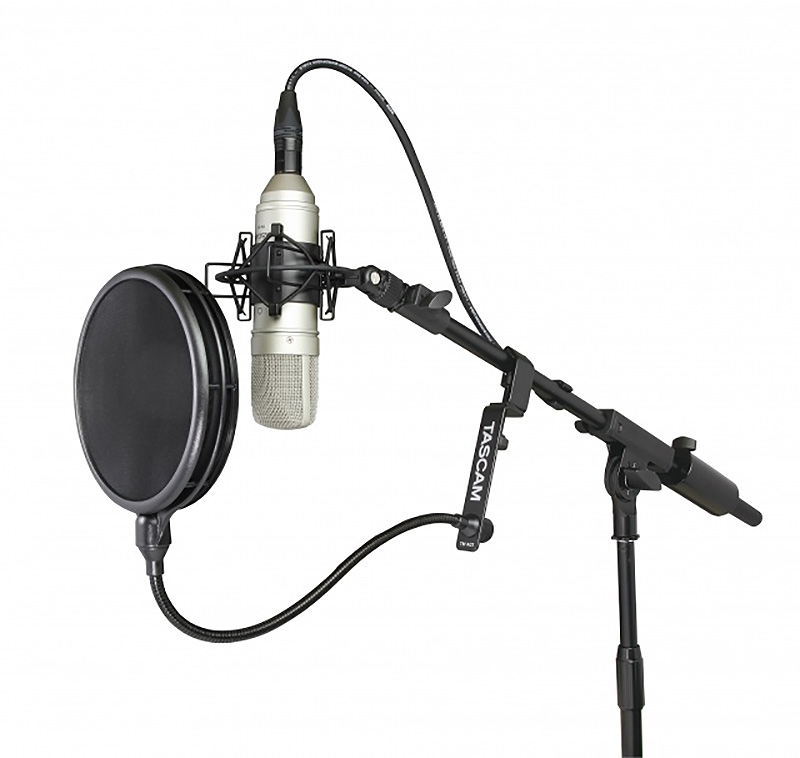
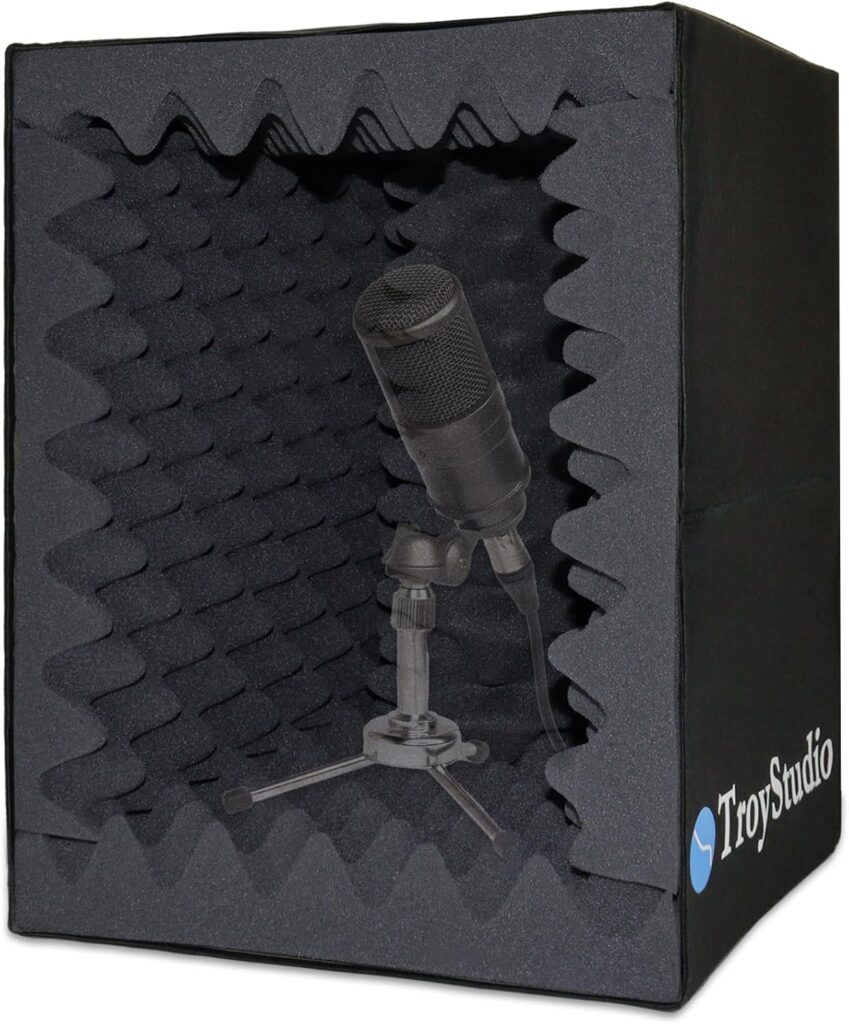
Isolation Shields
An isolation shield is a type of padded shielding that you set around your microphone to prevent it from picking up extraneous noises or echo when recording! These may be either open or enclosed, depending on your setup. As with the pop filter, DIY is always an option here!
One can build an enclosed isolation shield fairly cheaply by using a plastic bin or cardboard box, with some towels or a foam mattress pad. Just make sure that, when using directional mics with a cardioid recording pattern, that the front of the mic is facing outwards when you record, otherwise you may end up with extremely distant-sounding or muffled samples!

Advanced Recording Space Options
One option for accessing a more professional recording space is to scout around for local libraries that have audio rooms! Many libraries, both public and academic, have recently been adding multimedia spaces for patrons to be able to do activities such as podcasting and music. Some have even installed full sound isolation booths, such as a WhisperRoom. It’s definitely worth getting familiar with your local library branches to see what’s available!
The endgame of recording environments is of course the commercial studio. These often charge hourly rates and offer a multitude of extra services you might not need, such as mixing/mastering. Only look into this option if you can afford it! Studio time is absolutely NOT necessary to create a professional quality product.
Recording Software
For recording .
Audacity
Audacity is a basic, freeware audio editing application. In the case of vocalsynth recording, it is recommended only for CV (as one can record an entire reclist and split up the samples manually after the fact) and for recording singing samples for AI voice training. For more advanced concatenative (UTAU, DeepVocal) voicebanks, you’ll want to use one of the other options on this list instead.
RecStar
Lorem ipsum.
OREMO
Lorem ipsum.
Akorin
Lorem ipsum.
Volume & Tone
Lorem ipsum.
Singing Technique & Tips
Lorem ipsum.
Gain & Clipping
Lorem ipsum.
Japanese Pronunciation Tips
Please note: The following tips are from a non-native speaker who has worked on adjusting her accent for her Japanese voicebanks for a long time. I use these tips when coaching other non-native speakers who may have less knowledge of the language than I do in order to prevent common mistakes, but I do not intend to present myself as an expert in the language!
Japanese Vowels
A –
I –
U –
E –
O –
N – Yes, “n” is considered a vowel in Japanese, and is often held for emphasis on words!
Japanese Consonants
The “T” Set • た [てぃ] [つ] て と
Take special note of a couple of these consonants! “Ti” does not typically appear in Japanese, it is instead replaced by “chi”. “tu”
The Japanese “R” • ら り る れ ろ
“Glides”
Glides are a particular type of consonant cluster in Japanese. They consist of a combination of a consonant and “y”.
For instance, the city “Tokyo” uses the glide [きょ] or [kyo]. While non-native speakers typically pronounce this word as having three syllables (to-ki-yo), glides in Japanese are treated as a single syllable rather than two, and the consonant cluster is quite short – think of how you’d typically say “cute” rather than “ki-yoot”! When recording, you’ll want your glides to stay nice, crisp and short, without too much length or emphasis on the “y” part. The “ry” glides may take additional practice (it certainly took me years to get comfortable with them!)
Recording for Concatenative Engines
Lorem ipsum.
Choosing a Reclist
Lorem ipsum plus a link to the reclist directory.
Recording the Reclist
Lorem ipsum.
Recording for AI Engines
Lorem ipsum.

